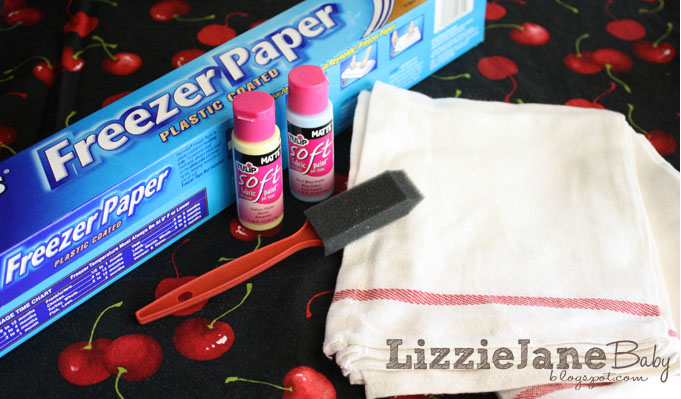
• Skip to primary navigation
  • Skip to main content
  • Skip to primary sidebar
Home About Contact New? Start Here!

Liz on Call

Make Everyday Fun

  • DIY CRAFTS
    • Cut Files
    • Decor
    • Gifts
    • T-Shirts
  • Disney
  • LIFESTYLE
    • Birthdays
    • Family
    • Party
    • Travel
  • PRINTABLES
    • Hand Lettering
  • Recipes
    • breakfast
    • appetizer
    • dinner
    • dessert
    • Drinks
  • Shop
Home About Contact New? Start Here!
  • Cut Files
  • Decor
  • Gifts
  • T-Shirts
  • Disney
  • Holidays
  • Recipes
    • Drinks
Home » CRAFTS

Crafting on a Dime @ See Vanessa Craft – Freezer Paper Stencils

Created On: September 6, 2012  |  Updated: March 19, 2014  |   1 Comment

This post and photos may contain Amazon or other affiliate links. If you purchase something through a  link, I may receive a small commission at no extra charge to you.


A few weeks ago I was able to do a guest post over at See Vanessa Craft.

I was able to share this fun tutorial with her readers and in case you missed it, here it is again.


Today I’m going to share with you how to make custom kitchen towels with freezer paper stencils.  Lately I’ve become bored with my decor in my family room and kitchen (which open up to each other).  I have a red statement wall that I love, but nothing else really exciting.  I told my husband I needed a change and he rolled his eyes.  Knowing that there’s not a ton of money to spend on any new decor, I decided to fancy up some kitchen towels to bring in some color!  (Plus I love to make t-shirts for my kids for holidays and trips and usually use iron on transfers which can be pricey.  So I’ve been wanting to try this technique!)

Materials:
Blue Fabric Paint ($1.07) I used a 40% off coupon at JoAnns
Yellow Fabric Paint ($1.07) I used a 40% Michaels coupon at JoAnns (in the same transaction!)
Paint Brushes .25/ea ($.50) craft store
Freezer Paper ($4.29) from local grocery store
Towels .80/ea ($2.40) from IKEA
Scissors/exacto knife/cricut/silhouette – free
Iron – free
Total Project Cost: $9.33  For 3 Towels

Materials


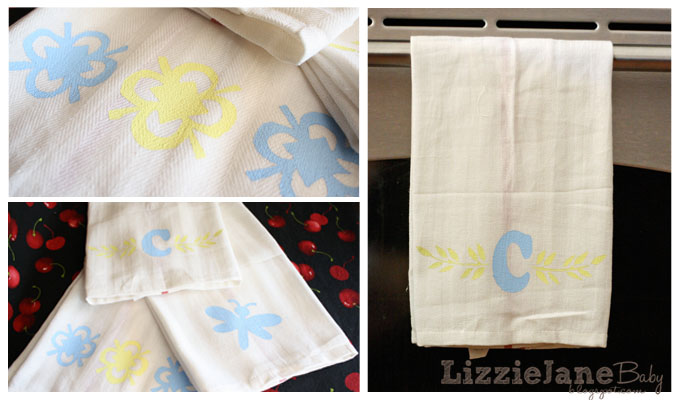
DirectionsStep 1: First you need to decide on a design and get it onto the freezer paper.
I used 3 different techniques for this step.

(on the left) I made up a design in photoshop and printed it directly onto the dull side of the freezer paper by cutting out a 8 1/2 x 11 inch piece of freezer paper and taping it to a regular sheet of paper to go through my printer.  (in the middle) I made a different design in photoshop and printed it onto regular paper, laid a piece of freezer paper on top of the design, dull side up, and used a pencil to trace it onto the freezer paper.  (on the right) I used my cricut to cut out a shape.  The only thing that was an issue was that if the cutting pressure and speed were too high, the freezer paper would tear.

Step 2: Cut out your stencil.
Using an exacto knife ( or you could use scissors if you don’t use a cutting machine), I laid my stencils on a piece of cardboard to cut them out.

Remember when cutting out your stencils to keep any little pieces that are a part of your design.  So that  when it is painted, anything that has freezer paper on it will not be painted and remain the color of the towel.
I didn’t worry too much about exact cutting of the stencil and in the final product you can’t really tell.
Step 3: Iron the stencil onto the towel

Make sure that when you go to iron on your stencil, the shiny side is on the towel, other wise, your stencil will stick to your iron. 🙂  You need to warm up your iron for a few minutes before this step, so that when you get to this point, the iron is warm enough to keep those edges down.  Or you will have paint leak under your stencil.


Step 4: Paint your towel

I laid my towel flat onto a piece of cardboard so my paint wouldn’t get onto my table.  Then Using a foam brush and a little fabric paint, paint the towel in the stenciled area.  Apply 2 coats of paint, making sure to let the first coat dry before the second.  Here are a few tips:
try not to get too carried with the paint and keep it in the “lines” 🙂
speed up the drying process with a blow dryer 🙂
make sure every bit inside the stencil is covered with paint
After the second coat of paint has had a chance to dry, peel off the stencil.
Step 5: Iron it one last time

Once the stencil has been removed and the paint is dry, take it back to the ironing board.  Cover the painted area with another cloth, I used a pillow case, and iron over the entire stenciled area to set the paint.  These can be washed in the washing machine, but you need to wait 72 hours before tossing them in there.  I washed mine and they washed up just fine.


Step 6: Enjoy your labors!

I hung up the towels in the kitchen to enjoy their brightness. This turned out to be such a fun little project.  Being that it was “on a dime” made it even better.  I think these would make for a cute bridal shower/wedding gift with a monogram or last name.  Now I’m excited to try it on other “materials”, like t-shirts and pillows!


If you don’t like the towels from Ikea, check your local dollar stores, Target or Walmart has a bundle of 5 for just under $5.00.

Happy Painting!

This post was first seen at See Vanessa Craft on August 23, 2012.
Thank you for subscribing to Lizzie Jane Baby.

To read more, or download a recipe, please visit Lizzie Jane Baby Blog.

Related Posts

  • Guest Post – Funfetti Cookie Sandwiches – See Vanessa Craft
  • Crafting
  • Hand Print Spider & Paper Web – Kid Craft
  • How To Make a Vinyl Stencil in Cricut Design Space
  • What is Freezer Paper?
  • Mother’s Day Gift – Grandma’s Paper Bouquet
Author Bio
Article Info
Popular Posts


Liz Call

Liz Call

Owner at Liz on Call
Liz Call loves to create. At Liz on Call you can find easy and attainable craft, DIY, party and gift ideas. Along with tons of free printables featuring her hand lettering designs and practice sheets. She hopes to inspire others to find something fun in everyday with her simple ideas and recipes.


Power Bio Box by Zyra Console


You are here:
Home
guest post
Crafting on a Dime @ See Vanessa Craft – Freezer Paper Stencils
Title:
Crafting on a Dime @ See Vanessa Craft – Freezer Paper Stencils

Authors:
  • Liz Call
Categories:
  • CRAFTS
  • decor
  • guest post
Mentions:
tutorial

Keywords:
Not Specified

Last Updated:
March 19, 2014

  • Free Mom Cut File
  • Bunny Cut File
  • Floral Heart Cut File
  • Funny Quote Cut Files
  • Bathroom Signs Cut Files
  • Free Dinosaur Printables
  • Layered Ornament SVG Files
  • Disney Lettering Practice Sheets
  • DIY Best Friends Shirts
  • Rustic DIY Mickey Mouse Ornament
  • Love you to the Moon and Back Free Printable
  • Mother’s Day Printable Cards

posted in: CRAFTS, decor, guest post

Previous
Tasty Tuesday – Packaged Ice Cream Sandwiches
Next
Spooktacular September @ Eighteen 25

Reader Interactions

Primary Sidebar

Liz - Author of Liz On Call.

Welcome, I'm Liz!

I’m the crafter, letterrer, designer, foodie and editor here. As a wife and mother of 3, I’m always on call. Let’s find something to help make your day fun!

More About Me
iphone
Want to be on call for fun?

Join The Email Club!

Hey On Callers, subscribe for awesome freebies, fun ideas and latest news.

Thanks! Keep an eye on your inbox for updates.
Liz On Call Shop Button 01 1
  • Shop
  • Cart
  • Checkout
  • My Account

Featured Fun

  • How To Make A Double Ribbon Bow For A Wreath
  • Pin Tail On Unicorn 4
    Free Pin The Tail On The Unicorn Printable
  • Mai Tai Mocktail Party Punch Recipe
    Raspberry Crush – the Best Party Punch Recipe
  • Diy Wall Calendar
    5 Ways to Letter the Alphabet
  • Fresh Squeezed Cut File 2
    Free Lemon Cut Files
  • Titled Image of Disneyland Castle
    Disneyland Time Saving Tips
iphone
Want to be on call for fun?

Join The Email Club!

Connect with

About Contact Media/Press
New? Start Here! Join Kid's Letter Lab Shop The Store Free Cut Files
©2025, Liz on Call. All Rights Reserved. Disclosures
Back To Top
Design by Pixel Me Designs
×
Want to be on call for fun?

Join The Email Club!

Hey On Callers, subscribe for awesome freebies, fun ideas and latest news.

Thanks! Keep an eye on your inbox for updates.