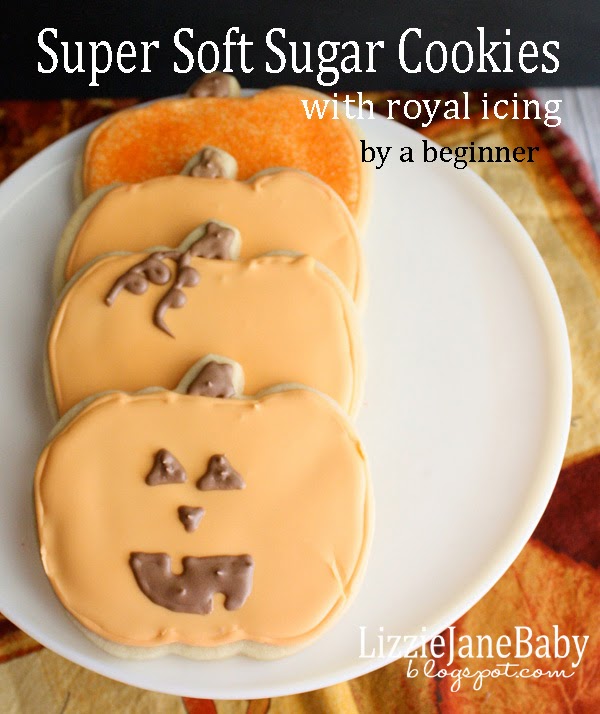
I have always wanted to try my hand at royal icing but have been too afraid. In fact, I don’t think I ever attempted sugar cookies from scratch on my own either. I usually will buy the pre made sugar cookie dough from the store or buy the mix. I always thought that they would take too much time and I just didn’t have time to spare. Well I finally decided to give it a try. These cookies were really easy to make and the royal icing wasn’t too hard either. But of course I’m no expert and this was my very first attempt, so I’ve got some room to improve.
But I wanted to share them with you in case you too have been wanting to try it and have been scared like me. As you can see, these cookies aren’t perfect, but they turned out pretty good. Plus they tasted good so I think most people over looked the mistakes. 😉
It started with a yummy sugar cookie recipe. Once I baked all my cookies and let them cool completely, I could start with the icing.

I found two different recipes for royal icing. One calls for egg whites and one calls for meringue powder, which is powdered egg whites. I had meringue powder on hand since I use it in my frosting recipes for cupcakes, so that is what I went with.
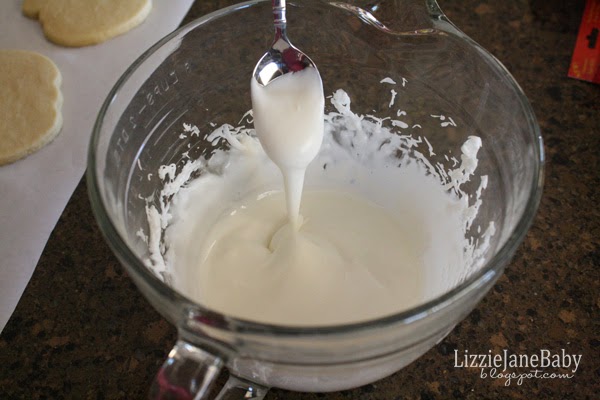
This consistency was perfect for outlining/piping around the design. As I’ve read about using royal icing I remembered 2 types of consistencies, piping and flooding. I was always afraid I would get them wrong. The piping consistency would be too loose and the flooding would be too stiff. It really wasn’t so scary after all. Just follow the recipe (at end of post) for the royal icing to get your piping consistency.
I used gel food coloring to get the orange color I needed for my pumpkins.

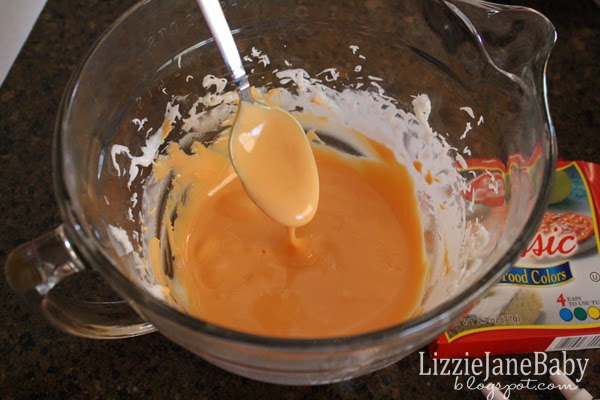
Once I had the right color, I added about 1/2 cup into a pastry bag with the smallest tip I had. I covered the remaining icing in my bowl with plastic wrap. You want to keep it covered while you work so it doesn’t get a crust on the top.

I outlined all the pumpkins with the piping consistency royal icing first.

Next comes the flooding. I didn’t wait hours to let the outside set up. I felt it was set up enough to just go to this step.
I added 1/2 tsp of water at a time to get a runny consistency. Then I just put a spoonful or two onto each cookie.
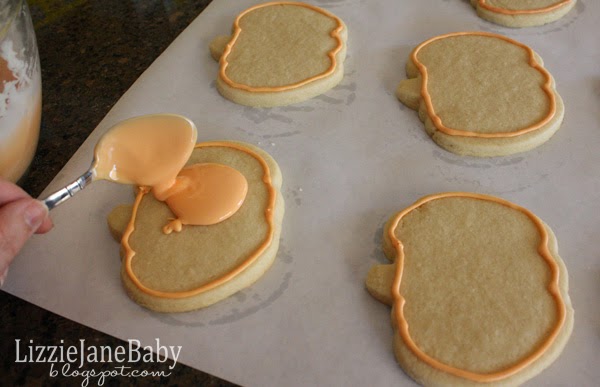
I used the back of the spoon to smooth it out to the edges.
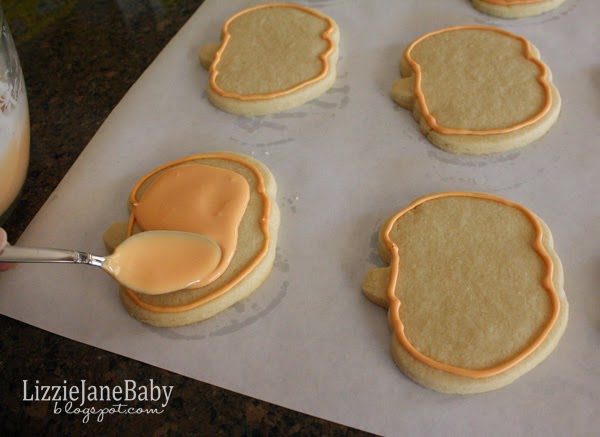
Here is what it looks when it is all flooded. Some people like to use pastry bags with larger tips for flooding or condiment squirt bottles, but I found the spoon worked just fine for this.

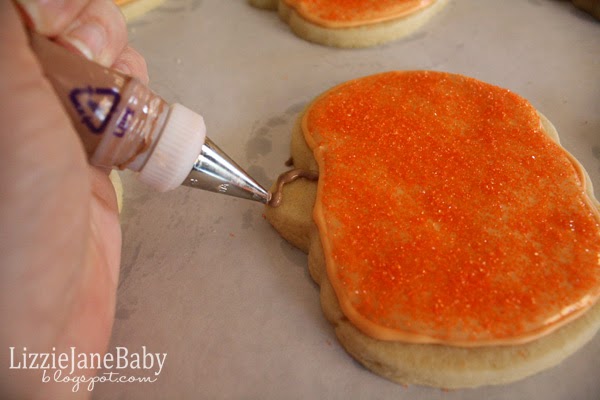
Once all my cookies were filled, I used my remaining orange icing and tinted it brown. I put it in a pastry bag and put on the small tip.

I then made the stem, added vines to some and jack o lantern faces to others.
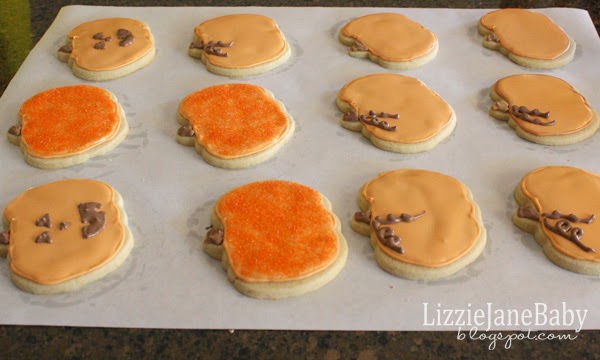
After I added the brown icing I let them set up for a couple hours so they would get hard.
I know there are so many more tricks to royal icing and I can’t wait to practice and get better. The pumpkin was a good one to start with because they can be simple. I’m an impatient person, so having to wait for lots of layers and details to dry just wasn’t going to work for me this time.

I’m excited to make these cookies again for an upcoming party and of course for the holiday season!
Yield: 30 cookies
Sugar Cookies

No Ratings
Prep Time
20 minutes
Cook Time
10 minutes
Total Time
30 minutes
Ingredients
- 2 1/4 cups white sugar
- 3 sticks butter - room temperature
- 3 eggs
- 1 TBL vanilla
- 1 1/4 tsp. baking powder
- 3/4 tsp. salt
- 4 1/2 - 5 cups flour
Instructions
- in a mixing bowl with paddle attachment, cream together sugar and butter until fluffy.
- Add eggs and vanilla and mix until incorporated.
- Sift together dry ingredients and slowly add to sugar mixture and mix.
- Dump cookie dough onto plastic wrap, wrap up and chill for 1 hour.
- Unwrap dough onto floured surface and roll out to 1/4 inch thickness.
- Cut out shapes with cookie cutters
- Place 2 inches apart on baking sheet and bake at 350 degrees for 9-12 minutes.
- Let cool on pan for 5 minutes and then move them onto parchment paper to continue cooling.
Royal Icing
No Ratings
Ingredients
- 1 pound box powdered sugar
- 3 TBL meringue powder
- 6 TBL water
- Food coloring to create different colors of icing
Instructions
- Use a hand mixer and mix all ingredients together until smooth
- This is the consistency for piping around the edges.
- Add 1/2 tsp of water at a time to the remaining icing to get a flodding consistency.
- Let icing set up for 8 hours or overnight.
Notes
Divide icing into bowls and add food coloring to get desired colors for cookies.
Have you ever made sugar cookies with royal icing? I’d love to hear about it!
Happy Baking!


Liz Call
Owner at Liz on Call
- Picnic Time Lemonade Disneyland Copycat Recipe
- Marvel Inspired Freakshake
- Citrus Almond Party Punch
- Valentine Party Punch Recipe
- Shark Party Punch
- Arizona Sunset Mocktail Party Punch
- Purple Ombre Cake
- Mickey Mouse Freak Shake
- Easy Pink Party Punch Recipe
- Mini Mickey Mouse Pizza
- Mai Tai Mocktail Party Punch Recipe
- Baked Bacon Cheeseburger Egg Rolls

Comments & Reviews
Hi liz, i’m Patricia, from Brazil. I love cook, and your help and instructions are grate. Thank you.
But i can’t the royal icing…..could you explain more this? I don’t have “meringue powder”……
Thanks so much
Patrícia
If you don’t have meringue powder, you could try an a couple egg whites instead. Just use less water.
Hi Liz! Your cookies and royal icing look phenomenal! Great job! One can not tell it was your first time to make these! Thanks for sharing your experience and the recipes! Happy Fall! Blessings from Bama!
They turned out ADORABLE!!!!!!! Love them. It’s my first time over here- love your space.